

I’m a big supporter of birthdays. My husband might even say I go over the top. But on your birthday, I believe you should experience all of your favorite things, whatever that means to you. It may be certain foods, certain activities, even a certain place. My son is constantly requesting homemade overnight cinnamon rolls for his birthday breakfast, and for the birthday breakfasts of his other family members. So when his sixth birthday rolled around, I knew what to expect. Of course, when he decided on a camouflage themed birthday, I knew I had to stay on trend with the homemade overnight cinnamon rolls.

I prefer to make overnight cinnamon rolls so that I can prepare them the day before, and bake them the morning I serve them. These cinnamon rolls came out tender and fluffy and melted in your mouth. They were the perfect birthday treat.
Dough
I started with a generic cinnamon roll recipe and added food coloring to get the camouflage look – these could arguably be St. Patricks Day cinnamon rolls too. All the extra steps happen at the front end. So everything is still prepared ahead of time, the rolls refrigerate overnight, then you pop them in the oven in the morning. Fresh cinnamon rolls before 8am!


After I mixed the dough, I separated it into 3 parts. I used this gel food coloring, in Avocado and Leaf Green, to tint two of the dough balls. I just squeezed 1-2 teaspoons into the middle of the dough ball, shown above, then kneaded it by hand. The gel food coloring did not mix uniformly into the dough, it had more of a tie-dye effect, which I think made the cinnamon rolls more camouflage-y anyways. I have not tested this theory, but if you want the dough to be uniform in color, I think adding the food coloring to the water in step 1 would be your best bet.


When the dough was colored to my liking, I separated each dough portion into three more portions. I arranged these in a greased bowl so the different colors were interspersed. And I strategically placed them so no dough was touching another dough of the same color. I covered the bowl and left it to proof for 2 hours. As the dough rises, the different colors meld together and it becomes one large dough ball again. Then it was time to roll it out!

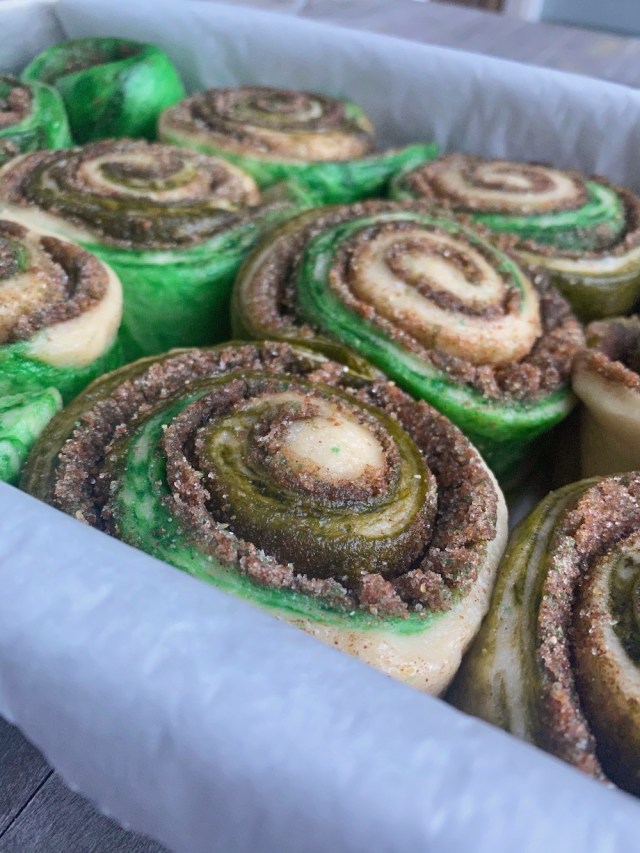
Okay, it wasn’t a perfect rectangle but these are homemade and we like a little imperfection around here. But see how the colors look like they have melted together? That happens in the proofing step. And I really like the marbled effect from the food coloring, it actually looked more like camouflage than I could have hoped! After rolling out the dough, I brushed it with melted butter and sprinkled on a generous serving of cinnamon and sugar. Don’t skimp here, those sugary crystals next to the fluffy dough are pure heaven when they come out of the oven.

Next, I rolled the dough into a log and cut out my cinnamon buns. I’ve seen people cut their cinnamon rolls with floss (make sure you use unflavored!) but I have a sharp serrated cheese knife, that with gentle pressure does the trick quite well. Typically my cinnamon rolls are hard to pinch closed because I over-fill them, but when the dough expands, those ends are tucked into the crevices of the pan, and have yet to cause me any problems.
I placed the rolls in greased pan lined with parchment paper and the waiting began.

Proofing

The cinnamon rolls chilled in the refrigerator overnight and, in the morning, proofed in the oven for 45 minutes. Next step, baking! See how the dough has expanded and filled most of the room in the pan? This is what you are looking for before baking. That’s how you know the yeast has done its job and you are just 30 minutes away from pure bliss.

Baking
All that cinnamon and sugar is just waiting to become ooey-gooey goodness that melts in your mouth. And not to sound like a broken record here but the camouflage color came out way better than I could have expected. But moving on. I baked the rolls for 30 minutes and impatiently waited for them to cool.

When the rolls were slightly cooled, I added the frosting and sprinkles. I used these sprinkles from Michael’s. With a little editing, they were exactly what I needed. It was surprisingly harder than I though it would be to find a sprinkle mix with varying green colors. So, I bought the avocado mix and removed the pink sprinkles and the avocado shaped sprinkles. Voila. These easy homemade overnight cinnamon rolls were ready for eating.


Then we devoured a few cinnamon rolls before heading to school. My son loved the new twist on cinnamon rolls and I can see many new color combinations in our future. If you are short on food coloring, you can make these cinnamon rolls “plain” (without coloring), I promise, they taste just as good!

“Camo” Overnight Cinnamon Rolls
Equipment
- Mixer
- Rolling Pin
Ingredients
- 3/4 cup Warm water
- 1/2 cup + 1 tbsp Sugar
- 2 1/4 tsp (1 packet) Active dry yeast I use Red Star
- 1/4 cup Buttermilk
- 1 Egg
- 1/3 cup Canola oil
- 4 1/2 cups All-purpose flour
- 1/2 tsp Salt
- 2 Colors of Gel Food Coloring
For The Filling
- 1 cup Sugar
- 1/3 cup Light brown sugar
- 4 tbsp Ground cinnamon
- 6 tbsp Butter
For the Frosting
- 8 ounces Cream cheese softened
- 2 cups Powdered sugar
- 1 tsp Lemon juice
- 1 tsp Half and half
- Sprinkles (optional)
Instructions
- In the bowl of a freestanding mixer, fitted with the dough hook, dissolve 1 tbsp of sugar in the warm water. Sprinkle yeast on top and let sit until foamy, about 10 minutes.
- In a small bowl, whisk buttermilk, egg and oil. Pour into the yeast mixture, add the remaining sugar, and stir to combine. Add 2 and 1/2 cups flour until combined, then add the remaining flour. Knead for 5 minutes until the dough pulls away from the bowl and is not sticky to the touch.
- Divide the dough into 3 even portions. Working with one portion, add 1-2 tsp of food coloring (depending on color preference) to the dough and knead by hand until the color is incorporated. I lined my countertop with parchment paper so the food coloring would not stain my countertops. Repeat with the second color. Leave one portion of the dough natural.Divide each of the 3 portions of dough into 3 pieces. Place the 9 portions of dough in an oiled bowl, with the colors interspersed, but still touching each other. Cover with plastic wrap, and let proof for 2 hours.
- Melt butter and set aside. In a small bowl, mix together sugar, brown sugar and cinnamon.
- Roll the dough into a rectangle, approximately 12 in by 18 in. Brush with melted butter, leaving 3/4 inch on one of the long sides uncovered. Sprinkle with sugar & cinnamon mixture. Tightly roll the dough, starting with the long side and roll toward the edge with no butter. Pinch seam to seal.
- Cut into twelve 1.5 inch rolls using a sharp serrated knife. Place buns in a greased 9 x 13 pan, lined with parchment paper. Cover with plastic wrap and refrigerate overnight.
- Fill a glass bowl, or other container, with boiling water and place on the bottom shelf of the oven, put the rolls on the top shelf and let proof 30-45 minutes. Remove the rolls and water from the oven, preheat to 350°F, and bake cinnamon rolls for 30-35 minutes until golden brown.
- Let rolls cool while you prepare the frosting. Whip ingredients with a hand mixer or stand mixer until smooth. Spread over cinnamon rolls once slightly cooled. Add sprinkles if desired. Enjoy warm!
Notes
What have you been cooking up lately? Do you have any go-to homemade overnight cinnamon roll recipes? I’d love to hear about them. Comment below or connect with me on instagram @elleandjaydesign. And now you can find me on Pinterest too!
Check out some of my other recipes here:


