

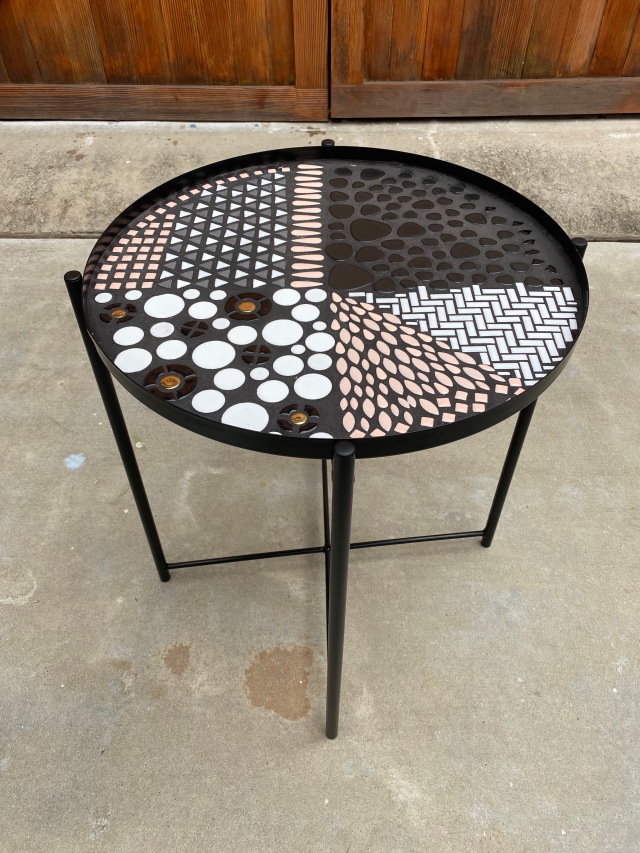
A few weeks ago, I shared these DIY mosaic planters from my last Pinterest Party and mentioned there was another craft we created the same night. Well, here it is! Along with mosaic planters, I also sourced materials to make mosaic side tables that turned out equally as cute as the planters. These projects are great because they are completely customizable to the colors and patterns each person likes, that will fit the style of their own home.
Again, the idea for this craft was taken from my Better Homes and Gardens June Magazine. We used the directions in the magazine as a guide, then modified steps to fit our project. This is definitely a beginner level craft, there are no specific skills needed, but its not a super fast craft. I would classify this as a weekend project, requiring about half a Saturday and half a Sunday to complete. Here’s how we completed these DIY mosaic tables:
The Supplies
- Ikea GLADOM tray table (comes in multiple colors)
- Mosaic sticky fiberglass mesh
- Liquid nails construction adhesive
- Notched trowel
- Sandpaper
- Weldbond (optional)
- Mosaic tiles (Funky Dreams Mosaics, Shining Eye Arts, Wit’s End Mosaic, Mosaic Trader USA)
- Jennifer’s mosaics powdered grout
- Craft sticks
- Small craft paintbrushes
- Disposable gloves
- Large format paper (optional)
The Process
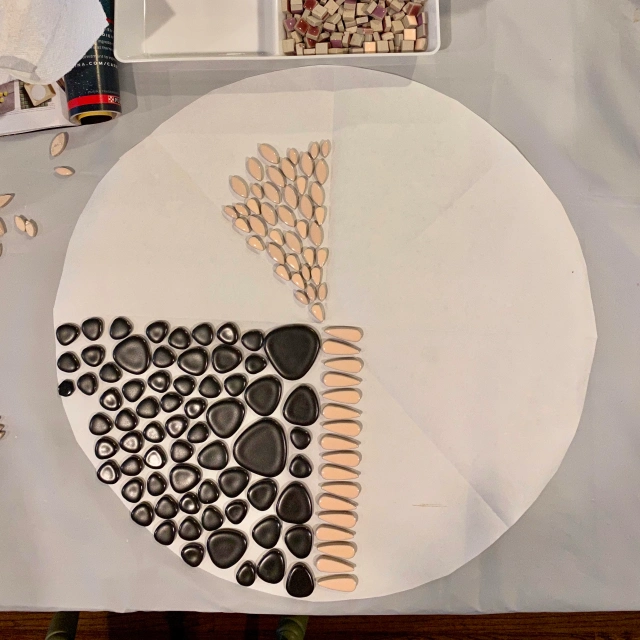


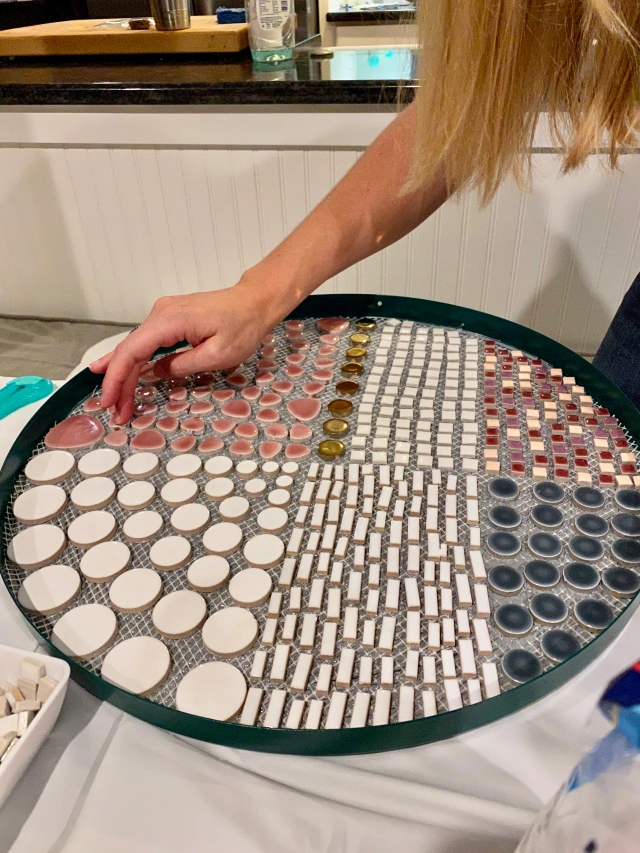
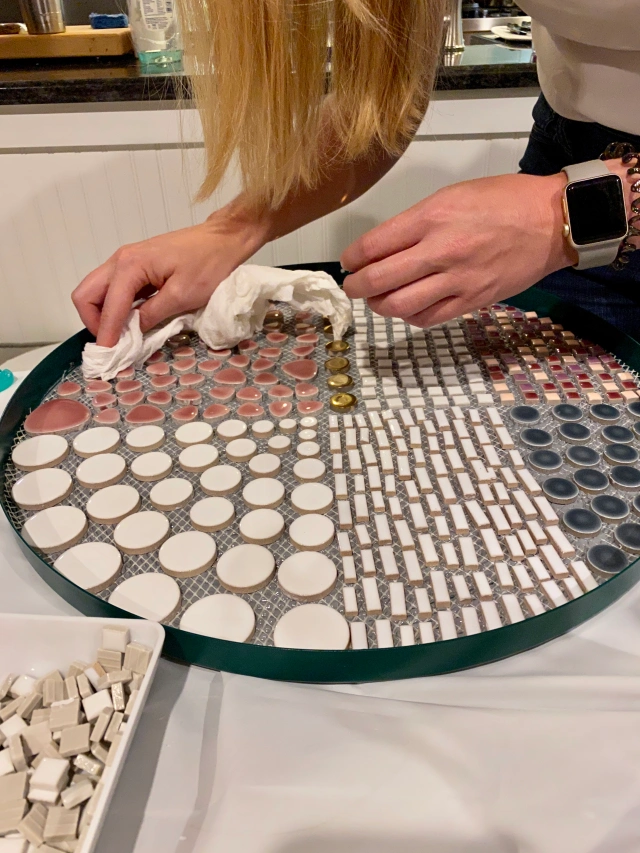
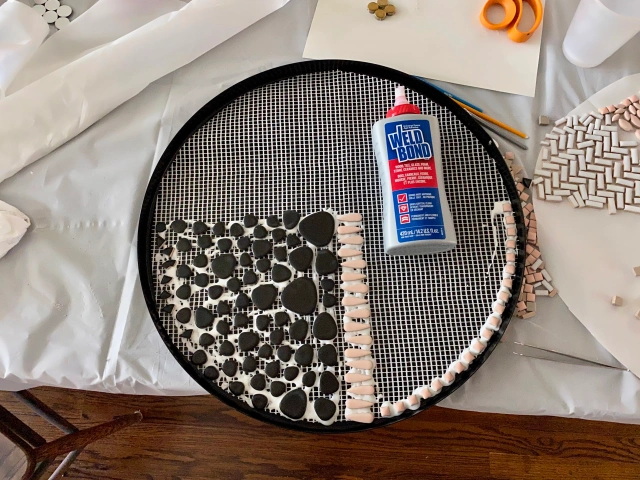
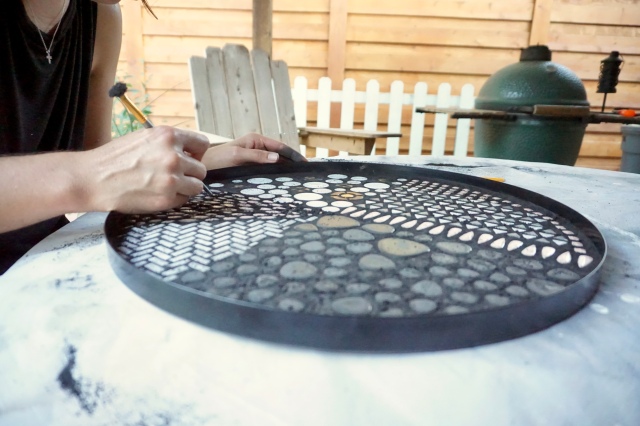
By far, the hardest part of this project, is deciding what tiles and pattern(s) to use, but you gotta start somewhere. We found it useful to trace the table top on a large piece of paper (I actually used parchment paper because it was the only thing I could find in my house that was wide enough) then cut out the circle to use as a guide. Once the circle is cut, fold it into eights and crease, then unfold. This separates the circle into 8 pie-piece shapes so that you can easily see the different quadrants and where the middle is. Originally, we used this paper to lay out our design, then transferred the tiles (one by one!) onto the sticky mesh once we were satisfied with our design.
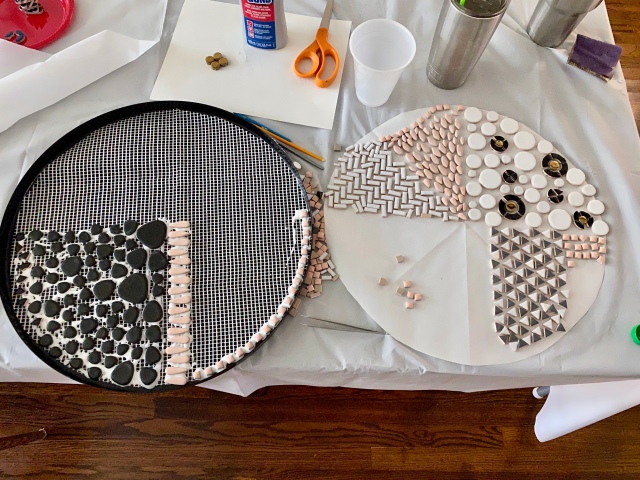
But, we realized it would be a whole lot easier to cut the sticky mesh to size (slightly larger than the circular table top) then place the circular paper cutout (with score lines) under the sticky mesh to serve as a template and grid (you could fold the paper however you fancy to break the circle up or draw your pattern on it). Then, just place the tiles directly on the mesh and save the tedious step of transferring them over. The sticky mesh was not that sticky that tiles couldn’t be rearranged or removed, which is what we were afraid of in the first place. Just lightly place your tiles on the mesh until you are happy with your arrangement, then place more pressure on them to adhere them to the mesh.
Once you have completed your design, its time to create the table top. Use sandpaper to rough up the top of the table (where the mosaic will go), this will allow the adhesive to adhere better. Apply a liberal amount of Liquid Nails to the table top, then spread it with a notched trowel so it evenly coats the surface of the table. The adhesive will ideally be half the thickness of your tiles. If you have varying heights of tiles, use the thinnest tile for this measurement.
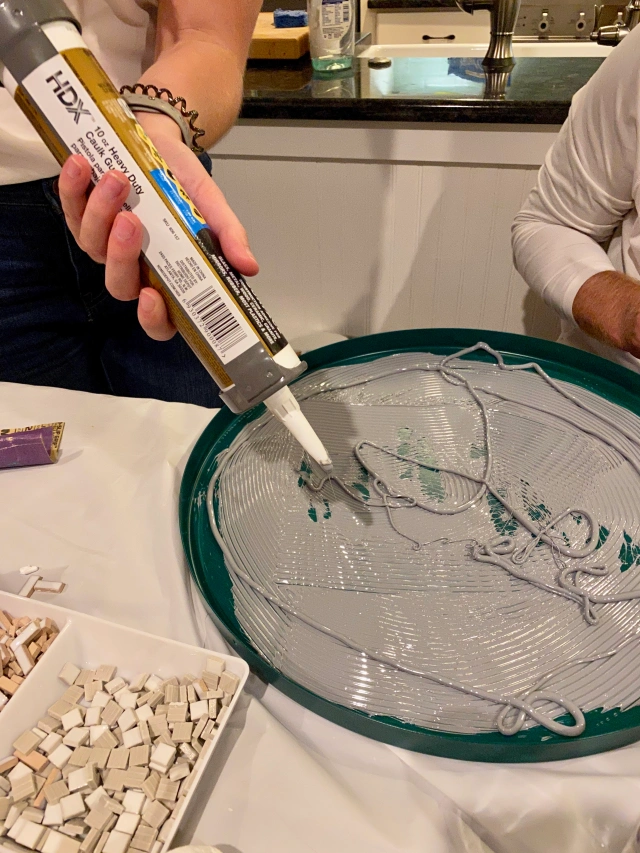
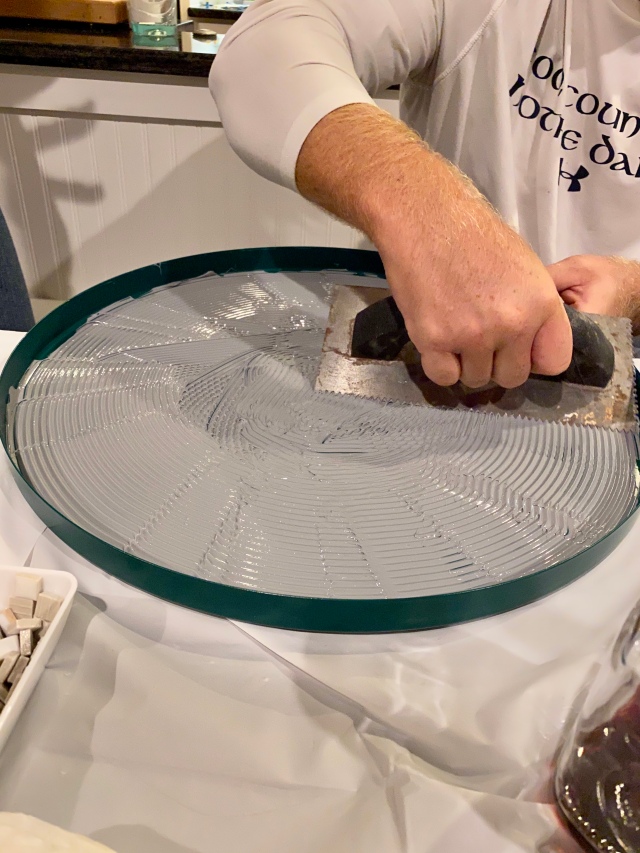
Now, carefully pick up the mesh with the tiles attached and lay it on top of the adhesive. This was actually not as nerve-wrecking as you would think, the tiles barely moved and if they did, they were easy to reposition. The good thing about using the construction adhesive is it doesn’t dry super fast, so there is plenty of time to readjust or swap out tiles if you decide to switch things up. Once you are satisfied with your design, apply pressure to the top of the tiles so they sink down into the adhesive, trim any excess mesh, then let the adhesive dry 24 hours. One note though – if any adhesive makes it onto the top or top edge of the tiles, make sure to remove it before it dries completely.
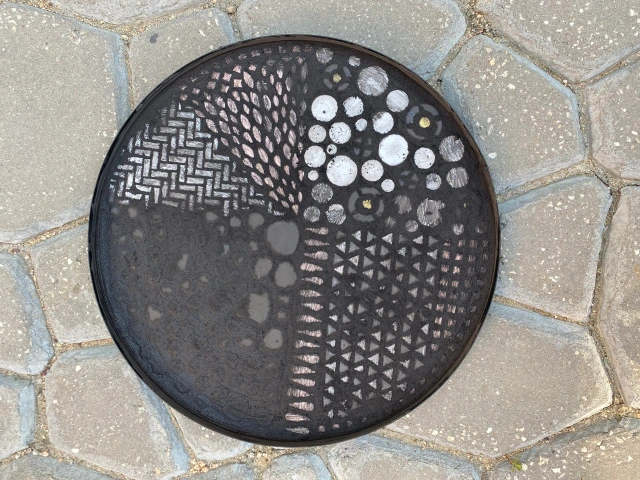
If you are paying attention, you’ll notice the black table pictured a few photos above doesn’t appear to have any construction adhesive on it. And thats because I ordered two rolls of “sticky” mesh from Amazon, and they happened to send me one sticky mesh and one non-sticky mesh – which I did not realize until after starting this project (the packaging was even labeled “STICKY MESH”!). So I had to improvise. With the non-sticky mesh, I simply cut the mesh to size (the size of the table top), placed it on the table top, then squeezed a liberal amount of Weldbond on top of the mesh and placed the tiles directly in the Weldbond, working in sections. There was enough Weldbond to seep under the mesh and adhere it to the table top and also adhere to the bottom of the tiles to keep them in place. I’m not sure if the mesh was completely necessary in this instance but I didn’t want to find out if it wasn’t, so I made it work. For time’s sake, I would highly recommend the sticky mesh, using the non-sticky mesh was tedious and time-consuming to say the least. Also, it took several days for the Weldbond to dry completely, so if you use this method, you will need to wait longer to grout.
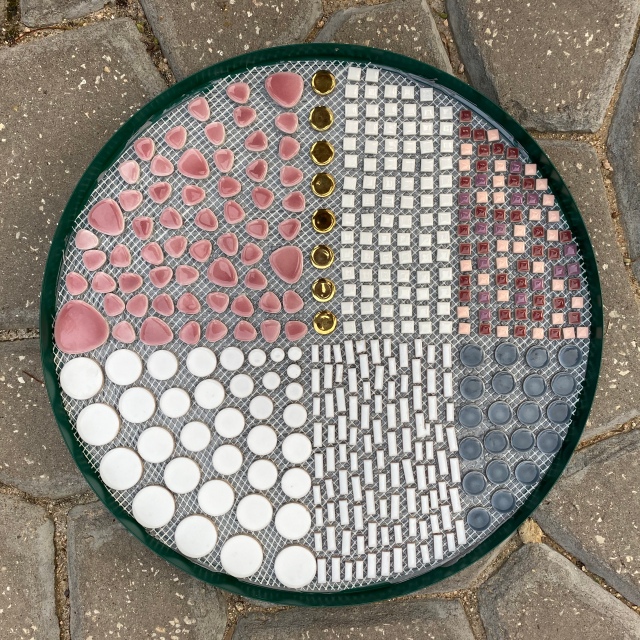
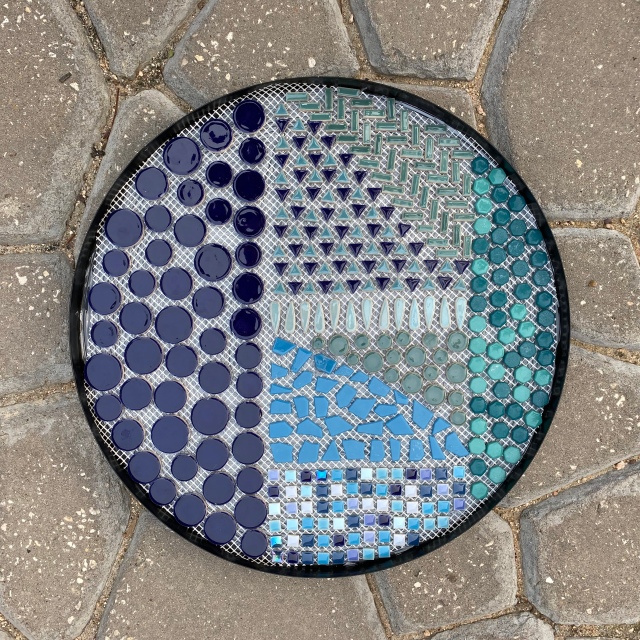
Here’s what the table tops looked like after the adhesive had set, before starting the grouting process:

After the adhesive has had ample time to dry, you can start grouting – for the liquid nails, this is about 24 hours, for the Weldbond, this is about 2-3 days. I used a craft stick to mix the grout and water according to the package directions. With a disposable glove on, smear the grout over the tile, making sure it fills all of the areas in between tiles and to the edge of the table top. Wipe off as much excess grout as you can from the face of the tile while still wearing the glove. Then let the grout set about 30 minutes.
Once the grout has started to dry, use a firm ‘sacrificial’ craft paintbrush (this will be the end of its life) to brush the slightly dried grout from the tiles. I used both the brush end of the paintbrush and the handle end – to scrape the grout from the edges of the tile.
This is not a very quick process when you use smaller tiles like I did, so make sure to set aside a couple hours for the grouting process. To speed this up, considering using larger tiles, like the black brookstone tiles or the while discs I used. The less tiles you have, the less tiles you have to brush off. But, this step must be done in one sitting! If you do not remove all of the excess grout before it dries, then you’ll be stuck with it. I removed as much grout from the tiles as I could with the paintbrush, then used wet paper towels to wipe down the tiles until all traces of grout were gone.
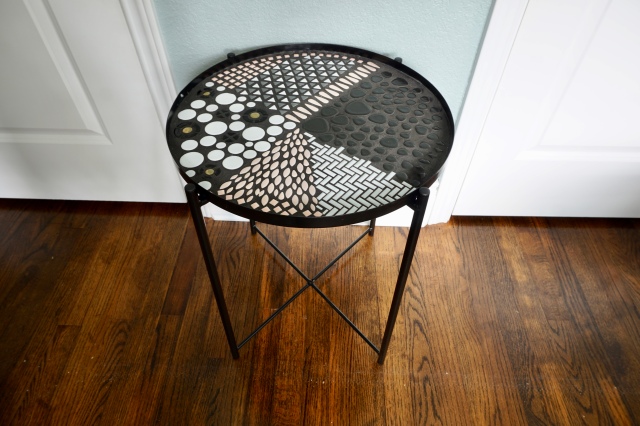
After using the paintbrush, I also tried using a grouting sponge (like you would use when grouting floor tile or wall tile) but I found it just smeared the grout around too much and didn’t really clean the tiles as I had hoped. Using the wet paper towels worked much better as I could wipe one individual tile at a time so it wouldn’t smear any excess grout onto the next tile. The key is to remove as much excess when you apply the grout and then brush/scrap off as much as you can with the paintbrush so that when you start wiping the tiles clean, there is less grout to smear around. Its one of those ‘it gets messier before it gets better’ kind of situations. Let the grout dry completely, then assemble the table. Then the table is ready for use!
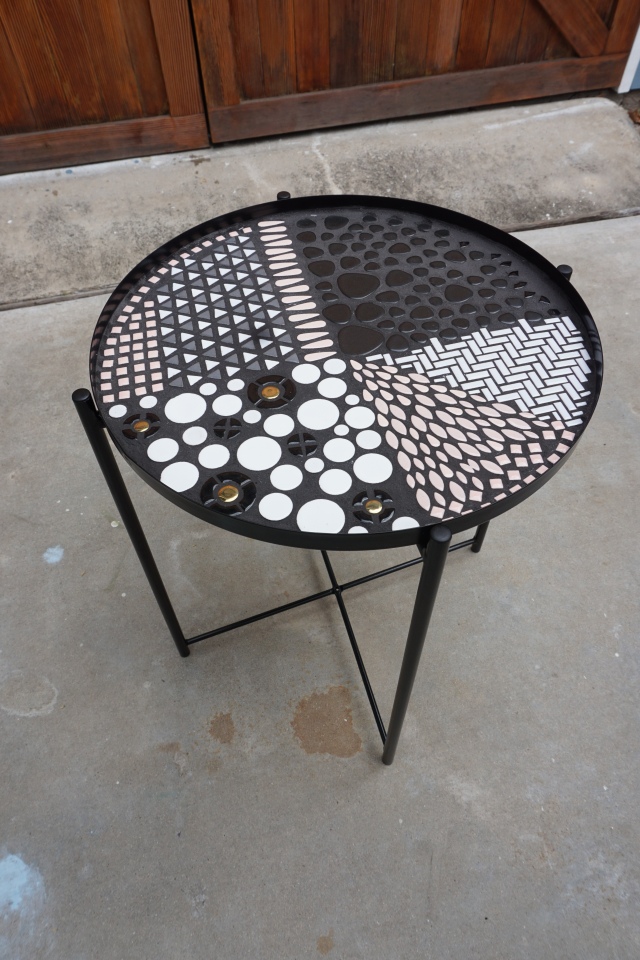
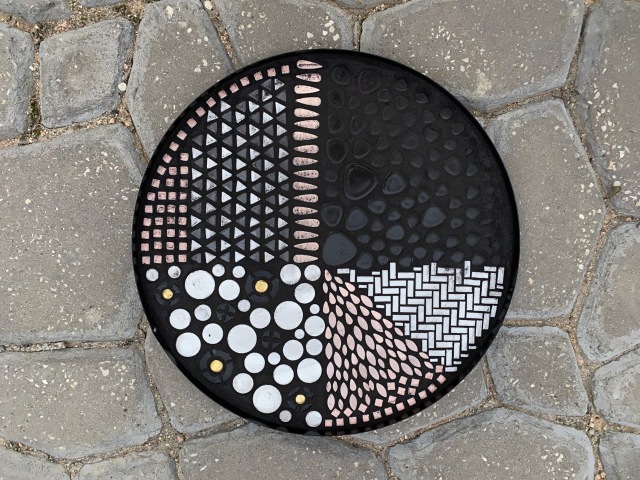
I made the above table as a gift for a family member who really loves black (and pink!) which is why I chose to go with the black grout, however, I do think the white grout gives the tables a more crisp look depending on what color tiles you use. While researching materials for this project, I read that you can also tint white grout with acrylic paint, just add it to the grout when you add in the water (start with a small amount, you can always add more), if you want a colored grout besides the usual white or black.

Have you ever worked with mosaics before? I know I did several projects with mosaics as a kid but this was my first go at it in recent history. I’d love to hear about the craft projects you have going on! Comment below, or connect with me on instagram @elleandjaydesign. While you’re there, check out my highlights to see me completing this project in action.


