

I’m trying a new type of post and I’m calling it my Weekend Update, so when you’re done reading, let me know if you like it. Andrew and I were out of town last weekend (first trip away from our youngest child, her and I both did fine) with some friends, so this weekend we had a few projects to tackle. First up was our front deck. Every couple of years it needs a new coat of deck stain. We’ve only re-stain/sealed it once since we built it in 2014. It was looking weathered and my father-in-law offered to help stain and seal it when he came to town this month. Before he came to town, Andrew and I sanded the deck down to bare wood to ensure the best finish with the deck stain we picked.

Last weekend the deck and pergola were stained with one coat of Behr Premium Semi-transparent Waterproofing Stain & Sealer in Cedar Naturaltone. And let’s just say we were less than thrilled with the color we picked.

Our deck and pergola are made of cedar so Andrew just picked up two gallons of the deck stain in “Cedar Naturaltone” and it turned out much more orange than we had hoped. It actually looks better in the photo above than it does in person. Here’s a closer look:

After living with it for a few days, we decided we had to make a change. We went back to Home Depot and picked up a gallon of the same stain in a different color (the stain we choose can be tinted to about 60 different colors). This time we chose the “slate” color tint. So, Saturday morning we picked up our paint brushes and went to work. We put two coats of the Behr Premium Semi-transparent Waterproofing Stain & Sealer in Slate on the deck and pergola. We started with one coat but we felt it looked too streaky and when we tried a second coat we felt that the coverage was better. Here’s the difference in the two stain colors:

The slate stain is still wet in the picture above so it doesn’t look as shiny now that it has dried. I want to point out that the slate stain does not look the same as the sample on the deck stain pamphlet because we put it on top of the cedar naturaltone stain, but we were trying to even out the orange and were hoping to get a rich brown color, which we did. But please don’t think that if you stain your deck with “slate” that it will look the same as ours. We had to over-correct in a sense. All in all, it turned out slightly darker than I had pictured in my head but we like it much better than the “cedar (orange) naturaltone.”

After all the work, Andrew says he’s buying Trex (composite decking) next time he builds a deck, instead of real wood, so I’ll keep you posted on that.
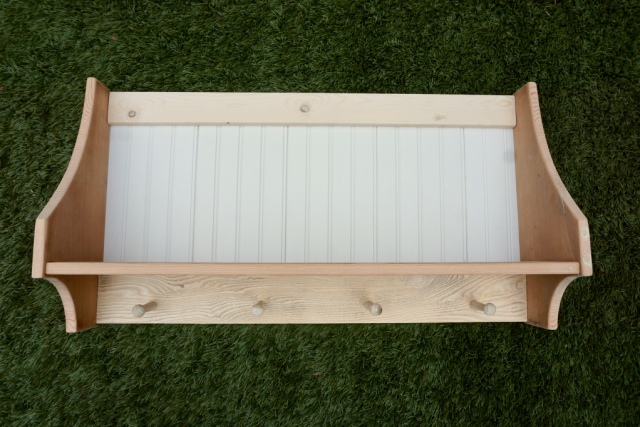
Second up on the project list this weekend was shelf building. A friend of mine read this post on our nursery and reached out for help in finding some shelves for her own nursery. In the end, she asked if we would make her some similar to the one’s we have. So, Sunday morning, Andrew whipped them right up. He can whip up shelves like I whip up a batch of pancakes; He already has all of the materials and barely needs a recipe.
First, he started on the bead-board backed shelf. He made a cardboard template for the end pieces (He just traced the shelf in our nursery), then cut the pieces with the jigsaw. Next, he cut the horizontal pieces to length, then routed all the edges. Then, he stared to assemble the shelf, filling the screw holes as he worked.


Once the frame was built, we added bead board and the skirt piece below the shelf.

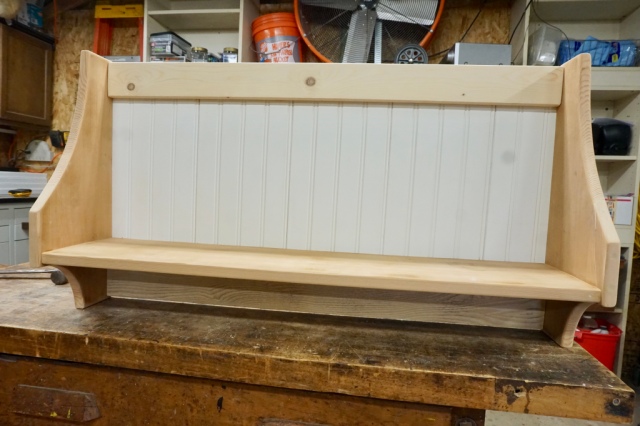
Last, we added wooden pegs under the shelf for hanging items. We will prime and paint everything this week so it will be ready for pick up this weekend.

The second shelf Andrew made was the crown moulding shelf. We started with a piece of crown moulding that came from a fireplace mantel we replaced at my parent’s house. I sanded it to remove the original finish, then Andrew cut it to length.

Next, Andrew made two corbels for the underside of the shelf and started to assemble the pieces.


The top was attached with glue and a few nails, and all the nail holes were filled with wood putty.

I will prime and paint this one, as well as add hooks to the underside of the crown moulding for hanging headbands and bows. I’ll be sure to share the finished photos when they are completed.
This weekend I also tried a recipe for Cuban bread. Andrew grilled pork tenderloin the other day and since I’m not one to eat leftovers unless they are “reinvented,” I went on a hunt to find a new use for the pork. We buy our pork tenderloins from Costco and each package comes with two pieces. One piece is plenty for our family and although I could use the rest for salad toppers (I eat salads for lunch everyday) I was feeling adventurous. Thats when I came across the idea of using the leftover pork for Cuban sandwiches. What’s just as important as the pork in Cuban sandwiches? Yup, the bread. I found this recipe on pinterest (duh!) and got to work.

If you try this recipe too, note that I had to add much more flour to the dough than it called for (not sure if this was caused by an error on my part or the recipe’s). They look and smell delicious but at the time of writing this post, we haven’t had the Cuban sandwiches yet, so I can’t tell you how they taste. Look forward to my instagram story (@elleandjaydesign) when I grill them up tonight!
And just in case you are dying to know, here’s the other recipes I’m serving up this week:
- Baked Meatballs in Marinara with Zoodles – a crowd favorite
- Breakfast Fried Cauliflower Rice – With a little goat cheese sprinkled on top
- Grilled Chicken Fajita Salad – this one never gets old
- Slow Cooker Chicken Pot Pie and biscuits
- Homemade Pizza – our Friday tradition
While I was in the kitchen, I also had a moment to refresh and organize my pantry cabinet. I recently received a package of new OXO pop top containers and if you’ve read this post, you know they’re one of my favorites. So, I took 30 minutes and went through the items in my pantry, sorted them into my new containers, then rearranged canisters so they would all fit in my cabinet (sometimes its like playing tetris!).

Consider this “Exhibit A” for when The Home Edit opens an Austin office and I submit my resume.
That’s my weekend update! What were you and yours up to this weekend? Comment below or connect with me on instagram @elleandjaydesign.


Love your deck!!! 🙂 I need your consulting on my back yard situation…