

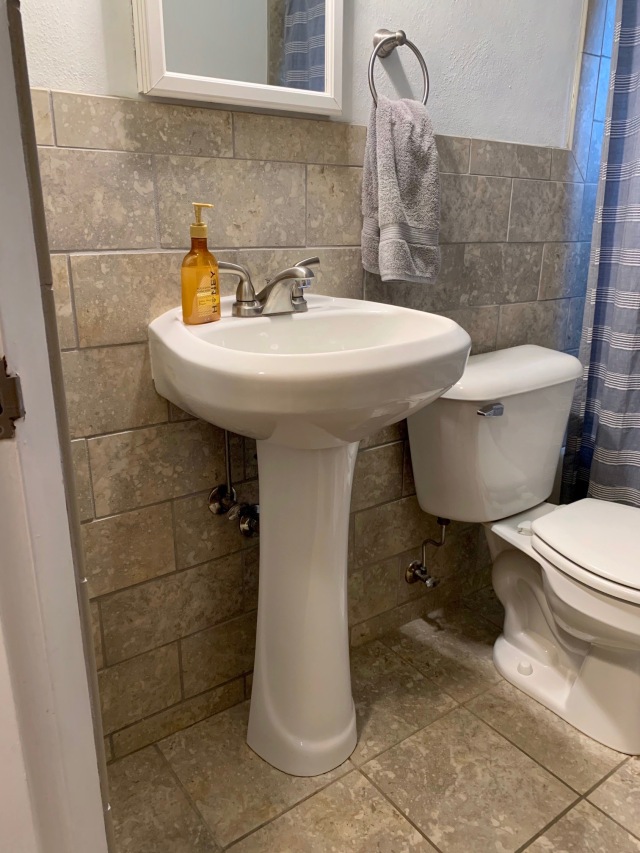
Hiiiiiiii! I am so excited to share this project with you today. It came together in a whirlwind of two weekends, traveled almost 1500 miles, then we wrapped up the install two weeks later. Several weeks ago, I wrote this post on our plans for my brother-in-law’s new vanity. There used to be a pedestal sink in his fairly small bathroom which left no countertop space and ample room around the sink that would be better suited as storage, so when Sam and Ellie couldn’t find a vanity cabinet in the right size, we were delighted they asked for our help.
As you may remember from my planning post, the space where the sink sits is not a standard size, and could only accommodate a cabinet 17″ deep. So although the width and height of the vanity are very common sizes, the depth is what necessitated this custom piece. And I linked all the materials and sources for what we used and bought at the end of this post for ya.
So, here’s the process we took to build this custom piece. In true Spitzfaden fashion, we did a few things out of order/unconventionally – which I don’t necessarily recommend – but in the end, we were left with a beautiful piece. Keep reading to see what I mean.
The Concrete Countertop


Do you typically start with the countertops when building a custom vanity? Nope. Did we? You betcha. We had a hard deadline to deliver this piece to Sam and Ellie, so our timeline to make the vanity was about 2 weeks. Since we wanted the concrete to cure as much as possible before transporting it almost 1500 miles, we started with pouring the concrete first.
To start, Andrew built a form, or mold, for the concrete countertop. Because we wanted the concrete surfaces to be smooth after it cured, we used melamine (a laminated particleboard) for the walls of the form and dry erase marker board (with plywood underneath) for the base of the form. We poured the concrete countertop upside-down, so the base of the form became the top of the counter – hence why we used the dry erase marker board on that part.
The only tricky part when building the form was we wanted the concrete to follow the shape of the farmhouse sink we ordered, which had not been delivered yet (I told you this project happened fast), so we had no way to measure the sink without physically having it in our hands. If you are not familiar with a farmhouse sink, the countertop to sink relationship is similar to an under mount sink where the hole cut into the countertop follows the inside edge of the sink. Im sure you can imagine how hard it is to ‘cut’ out the sink shape (or in our case, make a form for the cut out) when you don’t have the actual sink. We did our best to sketch out the shape of the sink corners using photos and the specification sheet provided online. And I’m happy to report we got pretty darn close.

To make the part of the form that needed to be curved, we used a piece of plastic instead of the melamine. Since the melamine is particle board, it can only be cut at right angles, for this purpose anyways. The plastic we used is made for concrete forms and is similar to the material of a plastic cutting board and we already had it on hand from a project Andrew did at work. Andrew cut it to length, then curved the ends with his bench top sander (shown above).


After the form was complete, Andrew caulked the edges – this is one technique used to produce rounded edges. If the concrete was left at a hard 90 degree angle, it could potentially be pretty sharp and scratch anyone who brushed up against it. We added a cylindrical styrofoam piece, wrapped in electrical tape, to act as the hole for the faucet and added some thin metal mesh for structural support (like rebar in a concrete slab).

Although it was not necessary, Andrew broke out the concrete mixer and the kids had a blast watching the concrete come together. Quikrete makes a countertop specific concrete mix that makes this into a doable DIY, which we found at our local Lowe’s. We followed the directions on the bag, then poured the concrete into our form.

Andrew smoothed the top of the concrete (which will eventually become the bottom – remember, we poured it upside down) with a trowel, then we waited for it to set up and cure. Since we poured the countertop upside-down, it wasn’t super important to use the trowel to make the concrete smooth on the top, you are just aiming to make it level so that it will sit nicely on the vanity cabinet when you flip it over.

The concrete starts a very dark gray and as the concrete cures, it becomes lighter in color. We let the concrete cure in the form for 2.5 days, then removed the form and let it cure another week in the shop before attaching it to the vanity cabinet. While we waited for the concrete to cure, we started on the cabinet.


The Vanity Cabinet
After the concrete was poured, we turned our attention to the vanity cabinet. I detailed my whole planning process for this unit in my last post on this topic, but we chose to make a simple shaker style cabinet to go with the farmhouse sink and concrete countertop.
Andrew started building the vanity by constructing the two end panels, then connecting them with the horizontal pieces that frame the front and back of the vanity. Then he added the interior shelf and drawer. All of the wood used for this project came from our stock pile from past projects and scrap wood from friends.

End Panel 
Interior drawer

We used 2x2s for the four legs, and 1x2s, 1x3s, and 3/4″ plywood for the rest of the vanity cabinet. For the cabinet doors, we used 1x2s for the stiles and rails and MDF for the panels. Once the main part of the vanity cabinet was constructed, Andrew built a shelf for the sink to rest and two of the most adorable little drawers to flank each side of the sink, again using plywood, 1×2 and 1×6 (for the drawer fronts) scraps.


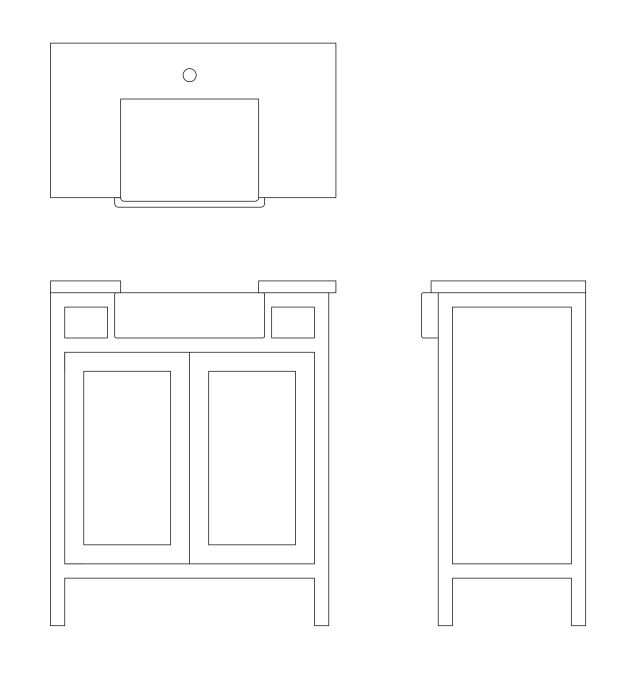
Here’s where I have a really embarrassing story to tell you. When I was designing this cabinet, I had to decide whether I wanted the sink to be centered on the countertop, or centered on the cabinet. Since the vanity would sit flush against the wall on the left hand side, there would be no countertop overhang on the left side like there would be on the right side. Essentially, the countertop is 3/4″ wider than the vanity – to account for the 3/4″ overhang on the right side. Let’s revisit the plans again.

See how the countertop overhangs the cabinet on the right side but not the left? The countertop is 30″ wide while the cabinet is 29 1/4″ wide. This was by design. But, if I centered the sink on the countertop, the center of the sink would not line up with the center of the doors. If I centered the sink on the cabinet, the length of countertop on each side of the sink would not be the same, there would be slightly more countertop on the right side. I much prefer the sink to line up with the cabinet because I don’t think the varying length of countertop is as noticeable. So a decision was made. Since the countertop had a 3/4″ overhang, I just needed to move the sink over 3/4″, right? So that’s what we did.
Wrong. Here’s the embarrassing part. I’m a math person. I used to teach math for crying out loud. And we measured once and cussed twice because if you move the sink over 3/4″, its too much. The countertop is 30″ wide which means its centerline is at 15″. The cabinet is 29 1/4″ wide which means its centerline is at 14 5/8″. The difference is only 3/8″, not 3/4″! Unfortunately, I drew up the plans you see above after this little mishap and the damage was already done. We had already poured the concrete and we didn’t have time to pour it again. So, we had to build the cabinet with this mistake in mind so that our countertop and sink would line up.
Long story short, the drawers on either side of the sink are not the same width. Insert palm to forehead emoji here. The irony of this whole situation is that I was trying to avoid the sink ending up off-center from the cabinet and that’s exactly where we ended up. But, as a wise woman once told me, it doesn’t have to be perfect to be beautiful.

Since the drawers were very narrow to begin with and we wanted to maximize the width of the actual drawer box, we used 1/4″ plywood for the drawer walls and mounted the drawer slides on the underside of the drawer. If we would have mounted the drawer slides on the sides of the drawer box (like we did with the large lower drawer) it would have made the inside width of the drawer 3/4″ to 1″ smaller. When your drawer is only 4″ wide to begin with, thats a lot of real estate to give up. Sidenote: it would not have changed the width of the drawer front, since that was fixed based on the frame of the cabinet but we wanted the drawers to have as much functionality as possible, so we opted to maximize the width at the expense of losing a little bit of height.
Then Andrew passed off the baton to me and I started the painting process.


Once everything was sanded, I wiped it down with a wet microfiber rag, then used a tack cloth to remove any remaining dust. I sprayed on two coats of Sherwin Williams’ wall and wood primer with my favorite Critter siphon gun. This primer dries super fast (and even faster in the Texas heat), so it was ready for paint in no time.


Since I painted the cabinet ‘Snowbound‘ by Sherwin Williams, its hard to tell the difference in the photos of the primer and the photos of the paint. I used Sherwin Williams’ Emerald Urethane Trim Enamel to ensure the cabinet was super durable and would stand up to everyday use and moisture from the shower. And I have to say, I was very happy with the finish of the paint. I sprayed on two coats and it dried super smooth. I painted the inside and outside of the cabinet, front and back of both doors, and all sides of the large drawer, and I had a very small amount of paint left from the quart that I bought – basically enough for a few touch ups if it ever gets scratched or dented. If you have a larger piece of furniture or cabinet, I would highly recommend going with a gallon.


When the paint was completely dry, we added hardware (knobs and pulls) and we were in the home stretch. Andrew attached the sink and countertop to the cabinet using epoxy, then caulked the joint between the sink and countertop with white caulk. Typically this would be done on site when you install the piece but since it had to travel so far, we opted to put the whole piece together and cross our fingers.

We had plans to meet Andrew’s family at the beach at the beginning of August, and since we were all driving, the fastest way for this vanity to make it to Saint Louis was for us to drive it from Austin, TX to Gulf Shores, AL, then for Sam and Ellie to take it from there to Saint Louis, MO. And luckily, it stayed in one piece the whole way!
Two weeks later, our family took a trip to Saint Louis and Andrew was able to install the vanity. Before the installation, I sealed the concrete countertop with two coats of 511 Impregnator Sealer and six coats of Safecoat Acrylacq. A polyester brush or foam brush work fine for both of these sealers. I waited 24 hours in between coats of the impregnator sealer, then another 24 hours before applying the Acrylacq. The Acrylacq dries pretty fast and is ready to recoat in 4-6 hours, so I was able to do two coats each day, one in the morning and one in the evening, and I lightly sanded with 220 grit aluminum oxide sandpaper in between coats. The Acrylacq goes on with a milky blue hue, but dries crystal clear. The directions said to use a minimum of 3 coats and since this countertop is in the main bathroom of this house, I wanted to make sure it was nice and protected.

In preparation of our arrival, my father-in-law disconnected the plumbing and removed the old sink, while we prayed our measurements were correct and the vanity would fit. Remember, we built this whole vanity off of measurements given to us by someone else, so we weren’t able to measure anything for ourselves. Often, in old houses the walls aren’t square or things aren’t up to code, so we were really hoping nothing would be too off.

Andrew anchored the cabinet to studs in the wall and then caulked the joint where the countertop meets the wall tile with clear caulk. Two photos above, it was still drying, so some of the caulk still looks white, but it all dried clear after about 24 hours. When Andrew caulked that joint, he placed frog tape on the countertop to have a nice crisp line when caulking. When we pulled up the frog tape, it also pulled up a little bit of the Acrylacq that I had brushed on that morning. Soooo, I brushed on another final coat after the vanity was installed. If you are in a similar situation, I would wait at least 24 hours after applying the Acrylacq to put anything on the countertops and next time I would use blue painter’s tape because its not as harsh as the frog tape.
We installed a new Moen Genta faucet and this project was done!


Remember where we started?
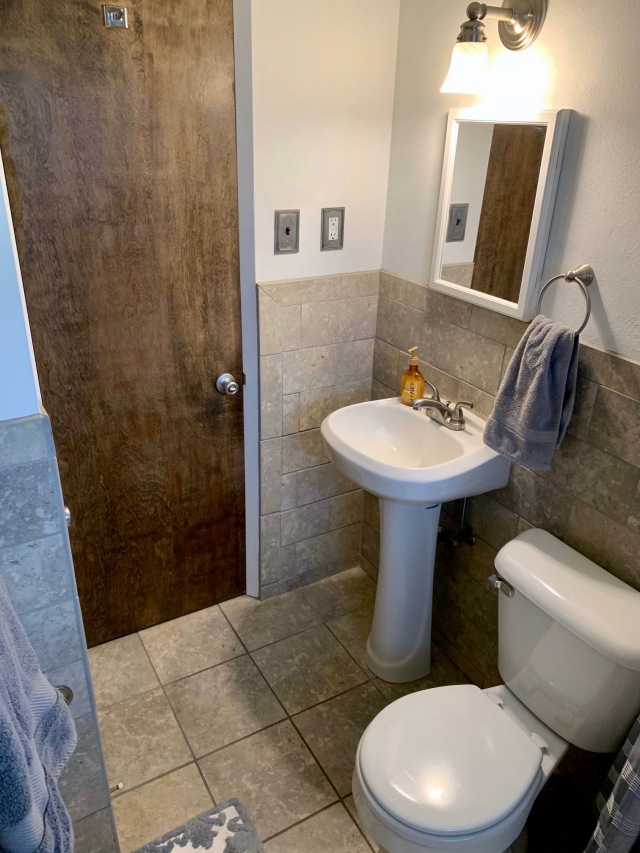

Previously, there was a lot of wasted space to the left of the sink and this vanity allows for more storage and some actual countertop space.

Sam and Ellie were thrilled with the new vanity and there are still more plans to update this bathroom but the major part is done for now!
Cost Breakdown
- Concrete and concrete form materials – $28.86
- Farmhouse sink – $61.69
- Cabinet door hinges (4) – $9.57
- Cabinet drawer slides (6) – $18.18
- Primer and Paint – $44.91
- Knobs, pulls and wood putty – $31.91
- Faucet and related items – $135.99
- Safecoat Acrylacq – $59.97
- Wood leftover from previous projects – $0
- 511 Impregnator sealer, from a previous project – $0
- Caulk – $12.95
- Aluminum oxide sandpaper – $7.56
All of the wood used on this project was from our stash of leftovers in our shop, so we saved a lot without that added material cost. All in, $412 was spent on this custom vanity (not including the gas to transport it almost 1500 miles), but with similar sized vanities selling for $800-$1000, I’d say this DIY is hard to beat. This was such a fun little project and although there were a few oops moments, we are very proud of our finished product.

Do you have any bathroom updates going on? If so, I’d love to hear about them. Comment below or connect with me on instagram @elleandjaydesign.


