

If You know me, you know I can’t pass up a free dresser. I’m a sucker for a quality piece of furniture in need of a little love. I want to save them all. Its so satisfying to know that the piece will live on and avoid the landfill with some elbow grease and a quart of paint. And so, as if it was meant to be, this dresser came into my life.

This dresser story started out much like my last dresser story from this post. Again, a member of my neighborhood’s Buy Nothing group posted a dresser they were giving away. Yup, just giving away to the first person who would come remove it from their house. So, back in January, when Andrew came home from work one day, I convinced him to help me acquire said dresser.
The great thing about the Buy Nothing group (check out Facebook and search for your area) is they are super localized, and in my area, all the group members are within several miles of each other. So, you never have far to travel when exchanging items. The couple who gave us this dresser said it was their grandmother’s and had been in their house since they inherited it from her. Its an old Thomasville piece and they estimated it was about 40 years old, so probably from the late 70’s/early 80’s.

The dresser was in pretty good shape, just a little bit of wear, but it was outdated and not really my style (or most people’s style, for that matter). We don’t have room for another dresser at our house, so originally I planned to refinish the dresser and sell it. Recently though, my sister bought a new house and when I asked if she needed a dresser, it was a resounding “Yes!” So we started the refinishing process with her in mind.
Since the dresser was too ornate and had a little too much detail for our taste, we started by removing the hardware and picture-frame moulding on the drawer fronts. The moulding was glued and nailed to the drawer front, so although it came off easily, it was not without damage.
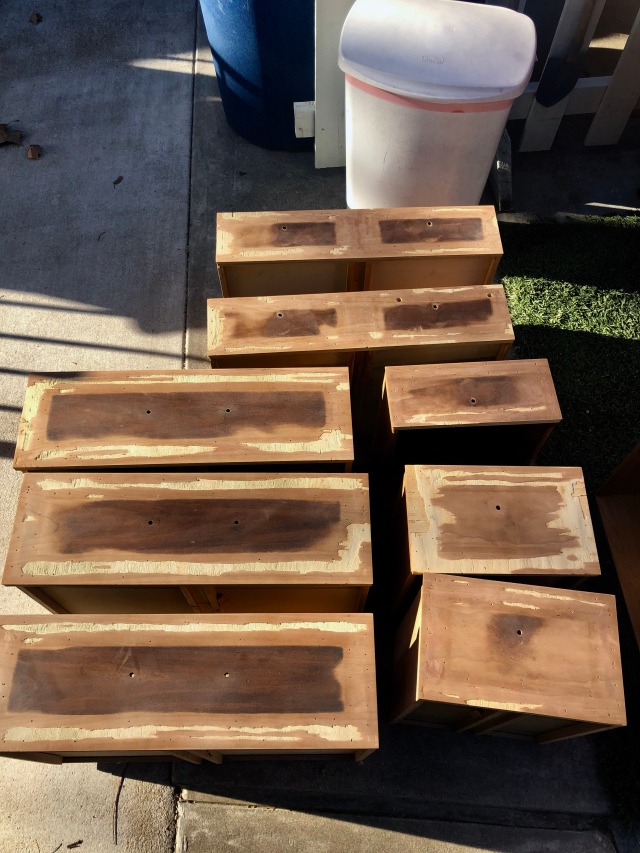

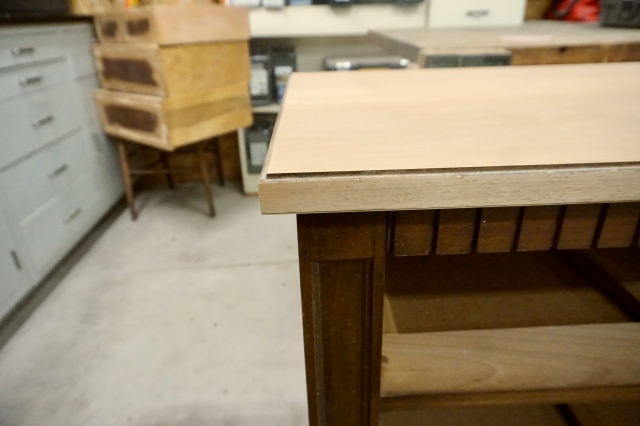
The drawer fronts were just plywood, and we planned to reface them anyways, so we weren’t too worried about how they looked after removing the moulding. Next, we sanded the top down to bare wood. The finish was thicker than we thought, so it took a good amount of elbow grease and sanding to remove the old stain and varnish.

The top of the dresser originally had a squared off edge and I wanted to soften it a bit, so Andrew re-routed the edge to add a more rounded profile.

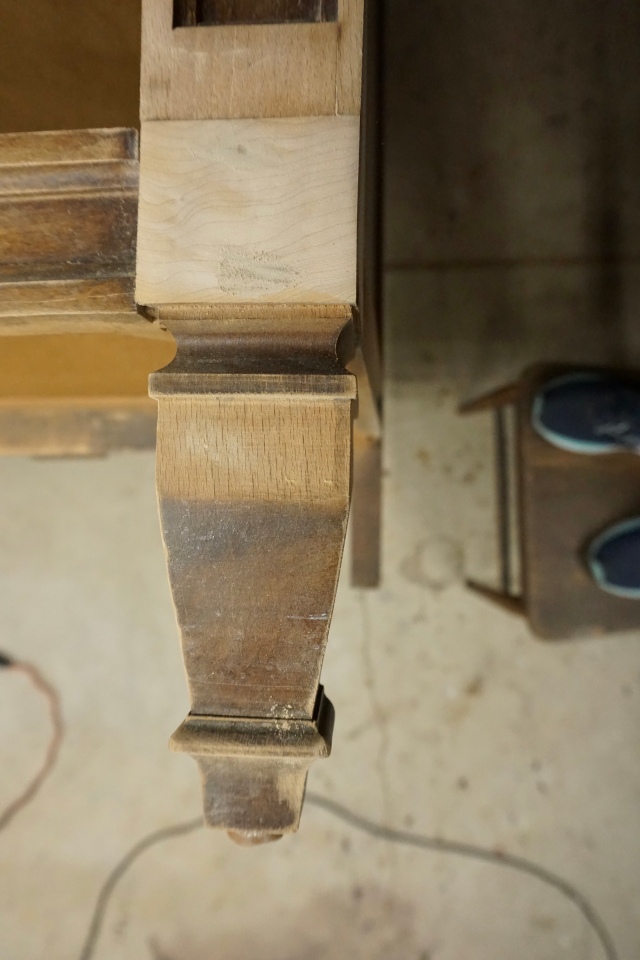
Then we moved onto the legs. I bought new feet to put on this dresser before we started this project because I didn’t like the original ones, but it turns out, we didn’t need them.

Andrew removed the decorative moulding at the top of the foot, then used his planer to remove the flower detail. When we stepped back to look at it, it looked much better than expected, and we kinda liked it. It had just enough detail to be interesting (and wasn’t plain looking at all).

Once the ornate features of the dresser were removed, its clean lines started to show through, and the dentil moulding above the drawers is one of my favorite details on this piece. Next, Andrew used MDF (medium density fiberboard) to put new faces on the drawers. Since we removed the decorative moulding from the drawer faces, they were inset from the frame of the dresser. So, we attached the MDF to the original drawer faces (instead of removing them and replacing them completely) to make up the depth from the frame to the drawer face. This made the drawer faces flush with the frame again. We choose MDF because it takes paint very well, and we had already decided to paint the body of the dresser.

Then she was ready for paint. I purchased a new siphon gun (paint sprayer) for this project that was recommended by Julia from the Chris Loves Julia blog. I’ve been waiting for a project to have a reason to pull the trigger (literally and figuratively) so when we started to work on this dresser, I ordered it as a birthday present to myself.
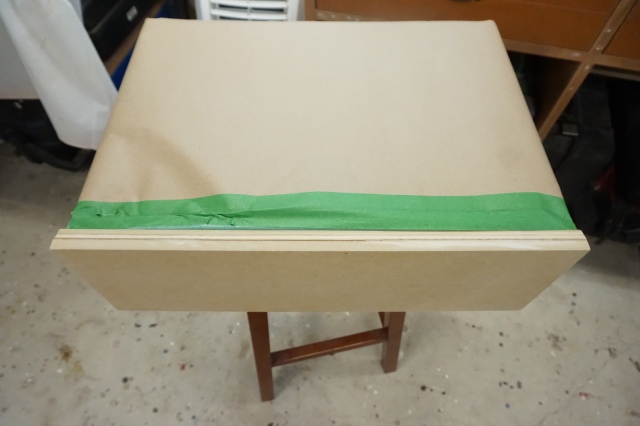
Now, we’ve never sprayed a dresser before, so when researching the best way to tape off the parts you don’t want paint to cover, I came across this tutorial from A Ray of Sunlight. Natalie suggested taping off the inside of the drawers, then sliding them back into the dresser, keeping them ajar slightly (so you can paint the top and sides of the drawer fronts). This keeps everything together (no bending over to paint the drawers standing on end) and it protects the inside of the dresser from over-spray (since the drawers are now blocking the cavity of the dresser).

I used Natalie’s method for taping off the drawers from her tutorial, but I didn’t have any pre-taped plastic so I just used kraft paper that I had on hand (spoiler – it worked just as well).

Now, Andrew was annoying helping me at this point, and since the drawers were going to be pushed most of the way into their slots, he didn’t see the need for the kraft paper. He simply put a few strips of painters tape on his drawers and called it good. We made a *friendly* wager and moved on.


After sanding the top of the dresser, we noticed it had a nice wood grain and was in good condition, so I decided to stain the top. So, after taping off the drawers, I also taped off the top of the dresser. We lightly sanded all other parts, then set up a paint station.

I sprayed on two coats of primer with my new sprayer and I’m happy to report that it worked great for this application. It’s very inexpensive so Andrew was very apprehensive that it wasn’t going to do a quality job, but as is the case sometimes, he was wrong. This siphon gun is easy to use, super easy to clean, doesn’t guzzle paint like some sprayers do, and didn’t get clogged one time. The only negative I came across was I had to wipe the nozzle every 5-10 minutes with a wet rag to wipe off specks of dried paint that would interfere with the spray pattern. But that took me all of 0.5 seconds, so for $35, I cannot recommend this sprayer enough.

After the primer dried, I moved onto the paint. I asked my sister what color she preferred, and we both decided black would look good in her new house and match her style.

I sprayed on 3 coats of black paint since they were thin coats, and in between the 1st and second coat, we lightly sanded everything to make sure we would have a smooth finish.

After painting, I removed all the tape and kraft paper and let the dresser dry completely. There was just a tiny bit of overspray that made it onto Andrew’s drawers that were not covered completely, but his method did work *almost* as well as mine. I’m not sure if the quality of my paint wasn’t up to snuff (it had been sitting in the garage from another project) or if the green off-brand painters tape was to blame but when I started to peel off the tape, it took a few chips of paint off the dresser (I just touched them up with a small craft paintbrush). So, I scored the rest of the areas before peeling off the tape (hence the box knife in my hand).

Next, I brushed 3 coats of Minwax polyurethane in semi-gloss onto the top of the dresser, sanding in between coats. Then we added brushed nickel pulls. And this baby was done.
Just to recap, here’s where we started:

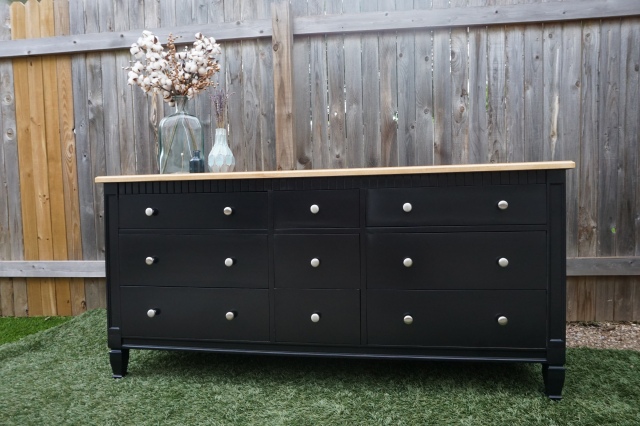
And here’s our finished product:

The dentil moulding is still my favorite.

Not surprisingly, we had all of the materials needed for this project, except for about half of the MDF. So in total, we spent about $24 on a 4′ x 8′ sheet of MDF (which we only used 1/4 of, so we’ll be able to use the rest on a future project). What projects have you been working on lately? I’d love to hear about them. Comment below or connect with me on instagram @elleandjaydesign.


