

December is always a busy month in our house, no only because of the extra holiday activities that are usually present, but also, I typically decide I want to make allll the homemade gifts for family and friends that I’ve been thinking about all year long and still haven’t started. After making my annual personalized ornaments that I shared last week, I couldn’t help myself but to try a few other resin projects while I had my supplies out.

I’ve known I wanted to make a few sets of resin coasters as holiday gifts since hosting my resin coaster Pinterest party back in February, so what better time to start than the second week of December, right? Here’s how I got the look of these two-toned marbled coasters:
Supplies
- Envirotex Lite Pour On Resin
- Resin Epoxy Pigments
- Geode Silicone Molds
- Graduated Plastic Cups
- Plastic cups
- Small Plastic Cups
- Crafts Sticks
- Disposable Gloves
- Gold Leaf Flakes
- Drinking Straw

The Process
First and foremost, when working with resin, make sure to cover your work surface well and always use gloves. Resin is very difficult to get off anything it was not intended to be on and the dyes will stain more than clothes and skin. Also, time is of the essence when working with resin, so make sure everything is prepped and ready to go when you start mixing.
I started this project by placing the gold leaf into the molds, attempting to form a line. This was my first time working with gold leaf flakes and I underestimated how much they would “stick” to the silicone molds. What I ended up with was a more organic blob of gold flakes than anything that resembled a line, but I am still pleased with the end result. I just lightly poured the gold leaf out of the bag, but once it touched the mold, it was nearly impossible to move. If you wanted a more precise placement of the gold leaf, I would try using tweezers or something similar to delicately place them where you want.

Once I poured the gold leaf into the molds, I used a craft stick to move any gold leaf that wasn’t stuck to the mold into a line, creating a sort of wall in the middle of the coaster. This divider helped to keep the different colors of my coaster separated when I poured them.
Next, I mixed the resin according to the package directions. For me, this meant using a 50/50 ratio and a two part mixing process. I measured 6 ounces (total) of resin and hardner into a graduated plastic cup, mixed for 2 minutes using a craft stick, then poured the resin mixture into a new cup (I just use a regular old plastic cup for the 2nd mix, its way cheaper than using another graduated cup) and mixed with a new craft stick.

Then, I separated the resin into small (shot glass sized) plastic cups to mix the dyes. I put about 1 ounce of resin in 3 separate cups, then left the other 3 ounces of resin in the mixing cup. I used 8-12 drops of dye (I used white, peacock blue, sky blue, then a mixture of sky blue, black and white) for each color I mixed.

I stirred the colors with a new craft stick until they were barely mixed, and even left a little not fully mixed. Then my 3-year old “helper” dropped some violet dye in the ‘white’ cup and the white got a little purple tint to it. So I just rolled with it.

I worked one coaster at a time since I was basically pouring two different colors that I wanted to meet in the middle. I started by pouring the white on one end of the mold and the sky blue on the other. Then I took the peacock and darker blue resin and poured circles of color on top of the sky blue.


I kept pouring circles of the blue colors and even added a few white circles, while also adding more white on the other side to even it out, until I had used half of the resin (I used 3 ounces for each mold).


After adding all of the resin to the mold, I used a clean craft stick to swirl the blue side of the coaster. I just did a few passes though the resin as it will continue to dissipate as it cures.

After about 15 minutes, I used a drinking straw to lightly blow hot air on the surface of the resin to pop the air bubbles.

I covered the coasters (to keep them free of dust and debris) and let them cure on a level surface overnight. If your surface is not level, your resin will cure a little thicker on one side than the other, which will make drinks sit slightly tilted on the coasters, so this is key! I use my kitchen countertops for the curing process (covered, of course) since I know this surface is level. Depending on the temperature and humidity, it can take 24-48 hours for the resin to fully cure. When the coasters were cured, I removed them from the molds.

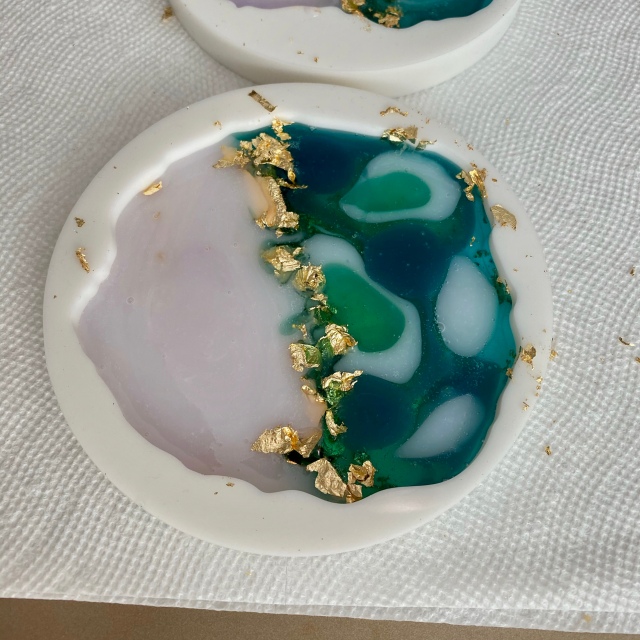
The marbling dissipated more than I thought it would but I think this is dependent on what type of dye is used – it was recommended to me to try using acrylic paint as a dye also, which can have an effect on the consistency of the resin and affect how much it ‘bleeds.’ But overall, I still love how they turned out and I can’t wait to try some more.

I might just wait a few more days to wrap them though 😉

Have you made any handmade holiday gifts this season? I’d love to hear about them! Comment below or connect with me on instagram @elleandjaydesign.


So Pretty!